Artwork Support Guide
This guide outlines issues you’ll need to consider when supplying artwork so as to avoid delays and ensure great quality print.
File formats
Regardless of what software is used to create your artwork, your final artwork file should be exported to a print-ready file format at an appropriate size, in the correct colour mode and featuring sufficient bleed area around the edge.
File size
The maximum file size that our server will allow is 60MB, although we recommend 40MB or less. This should be more than enough capacity to accommodate artwork at the required resolution for most of our products, provided an appropriate file format is used.
If for any reason you find you’re unable to upload your file, you can call our Design Team on 0844 257 9006 or email us at [email protected] who’ll be able to diagnose the issue or organise an alternative way for you to supply your file.
It’s also important that your file is not too small. An image that appears fine on screen may lose quality when printed full size. Read our Resolution Guide for information on how to ensure your image quality is up to spec.

We request all our artwork to be supplied as high resolution (300dpi). It is important that you prepare your PDF file in the correct way. These options must be set for commercial printing:
- Resolution - Choose High Resolution
- Colour - needs to be set as CMYK not RGB (RGB artwork will be converted to CMYK and this could affect your colours, see Colour Guide).
- Font Embedding - Should be set to "embed all fonts"
- Colour profile - Should be set to FOGRA39.
Illustrator

Include all embedded images and convert all text to outlines. Save as an AI or EPS file.
Photoshop

Set Resolution to 300dpi when starting your new document. Save the file as either PNG or JPEG.
Do not upload a PSD file as this format is not supported.
Microsoft Documents
Unfortunately, we’re unable to use the following formats for printing:
- Word
- Excel
- Powerpoint
- Publisher
- Works
As these applications aren’t designed to prepare print-ready artwork, we recommend you avoid them in favour of dedicated design software.
However, if you’re unable to create your artwork in any other program, it is possible to convert your Microsoft document from the proprietary file format into a print-ready PDF.
Below is a link to a free and easy-to-use website that can convert most image files into a useable PDF.
https://www.zamzar.com/
When you convert a Microsoft document into a PDF, it’s important to check that the colours still appear correct, that all text and design elements are present and that the image resolution is sufficient for print. For more information on resolution, see our Resolution Guide.
Resolution Guide
An image that looks great on-screen might not look so great in print. If the image that looked sharp on your monitor appears pixelated in print, that’s down to resolution. This guide will help you to understand the resolution requirements for print, and show you how to prepare your artwork so it looks just as good in your hand as it did on your computer.
What is resolution?
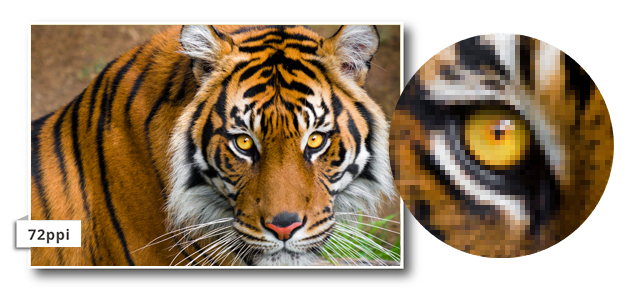
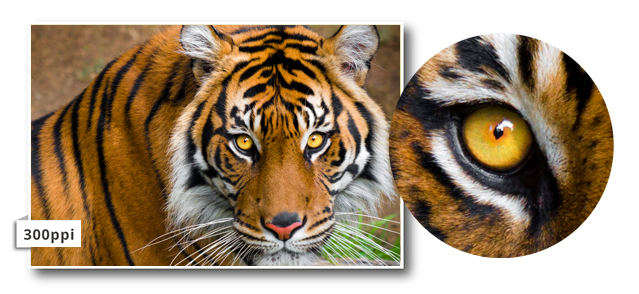
Resolution is a description of image quality. A high-resolution image will appear sharp and precise, while a low-resolution image will be blurred or pixelated. The standard units for measuring resolution are pixels per inch (ppi) on screen and dots per inch (dpi) in print, indicating the number of dots or pixels along an inch-long line. The more image data there is to play with, the finer the picture quality.


What resolution is required?
The industry standard requirement for digital artwork files is a minimum resolution of 300ppi, or pixels per inch. That way, the file will contain enough image data to allow a printer to print at 300dpi, or dots per inch.
That figure comes from the world of publishing, where we’re used to considering an image that’s printed onto something you can hold in your hands and observe at arm’s length. At this resolution, the eye will read the image as a nice, smooth, continuous picture, and not a blocky collage of colours.
How to create high-resolution documents
If you’re using design software to create or edit your artwork, it’s important to set the resolution for your project from the outset. In most programs, when you create a new image, a dialogue box will ask you how large you want your canvas and, crucially, X resolution and Y resolution.
X resolution dictates pixel density horizontally across the image and Y resolution does the same vertically. Lock these fields together or ensure the two values are identical to ensure consistent resolution horizontally and vertically.
There’ll usually be the option to pick what units of pixel density you’d like to use for resolution. For our purposes choose ‘pixels/in’ (this may appear as ‘PPI’ or ‘DPI’). For the vast majority of commercial print work, 300 will be an appropriate value to go for, because a 300ppi digital image will directly translate to 300dpi print resolution.
If you aren’t creating your artwork from scratch, you may want to check the resolution of any source images you wish to use.
How to check resolution
File size can be a fair indicator of the quality of an image, but it’s not conclusive. When preparing digital artwork to send to print, a revealing way to check it on screen is to zoom in on the image at three or four times the size of the final print. Viewing a PDF at 300% or 400%, for example, will give you an impression of how it might appear once printed.
This is because screens tend to display images at 72ppi whereas a print document will tend to be rendered at 300dpi. So by expanding your artwork to three or four times its real-life dimensions, you’ll be able to see if the image might appear pixelated in print.
When certain parts of a document are low resolution
Unfortunately, when an image that forms part of your artwork is low res, it’s unlikely you’ll be able to fix it. A skilled artworker may be able to sharpen up an image that’s only slightly below the threshold, but if there simply isn’t enough information there to display a sharp image, there’s not a lot that can be done.
In this case, the best idea is to replace low-resolution images with better quality, high-resolution ones. This could mean asking a designer to recreate them from scratch, or sourcing high-resolution stock imagery from one of the many providers online.
If you did require a designer to rebuild your image, our in-house design team is on hand to help. Please contact us for a quote and we’ll be happy to assist with creating artwork that’s perfect print quality.
The last option is to “risk it” and print your images as they are. This might be worth considering for very large items designed to be viewed at a distance, but we don’t recommend this approach as you most likely won’t achieve the clean, crisp appearance you’re after.
When part of a document is vectorised and the rest is low-resolution
This dilemma suggests that the wrong settings have been used in the software used to create your image. As a result, the quality has been reduced when saving as a JPEG or PDF. This can happen if the export settings in Adobe InDesign are incorrectly configured, or if the PDF has been saved from an MS Word document.
Preparing artwork in MS Word is seldom a good idea and best avoided. However, if you’re exporting from InDesign, make sure the resolution options are set to a minimum of 300ppi and that compression is set at maximum.
